Both screen and digital printing continue to form the core of the garment printing industry, especially with the introduction of hybrid printing systems that combine the best of both worlds. Even so, direct-to-film (DTF) printing has started shaking things up since its introduction sometime in 2020.
Most notably, critics would go so far as to declare that digital printing is on its last legs. Some would even say garment printing as a whole will be revolutionized by DTF printing. While we disagree with these sentiments, we do agree that DTF printing will be a big game-changer in time.
Let’s get right into it.
What’s Direct-to-Film Printing Anyway?
DTF is a printing process that transfers a design directly onto a garment or other substrates. The transfer is done by printing the design on a special transfer film, then heat pressing the film onto the surface on which you want the design.
The key point that helps DTF make the waves is how it works on various substrates: polyester, cotton, metal, or even ceramic. Want to put some designs on not just shirts but also cups? You can do that with DTF prints!
The Printing Process in Brief
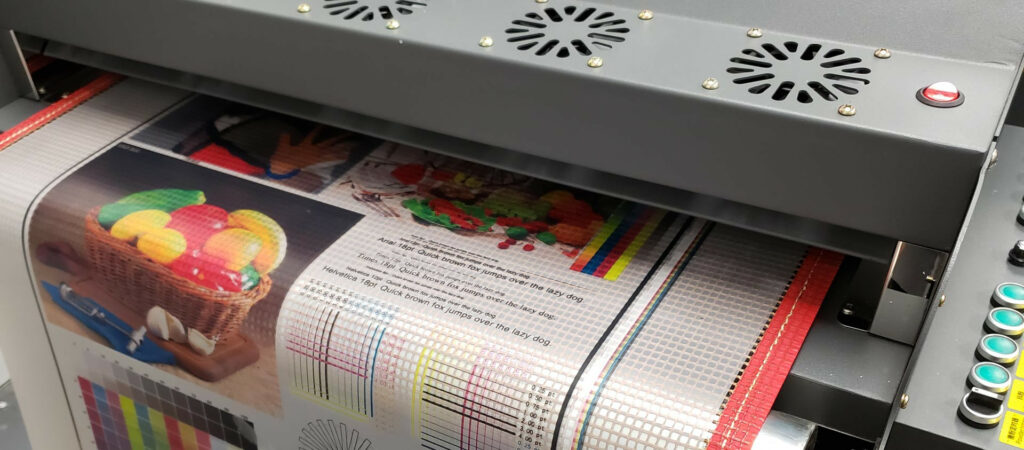
DTF printing involves printing a design onto a polyethylene terephthalate (PET) film transfer using water-based inks. The films are relatively thin, at about 0.75mm thickness, which also gives them better-transferring properties. Unlike the other printing methods, DTF prints its designs as a mirror image of the actual image. As for the inks, CMYK colors will be applied first, followed by white ink.
Once the ink is applied, a hot melt powder is added to set the ink into the print. The powder must be applied uniformly onto the wet ink and spread throughout the film. This is either done manually or using an automated powder shaker.
After applying the powder, the film is carefully placed inside a curing oven to melt the powder. Powder melting points usually range between 140 to 170 degrees Celsius (284-338℉). Once melted, the powder becomes an adhesive that allows the design to stick to the garment of choice. A heat press also works if you don’t have a curing oven. Just ensure not to press it down onto the film; leave a 4 to 7mm gap between the film and the heat press’ top plate.
Pre-pressing the garment helps dehumidify and flatten it, ensuring the transfer process goes smoothly. Once both garment and film are ready, the film is placed on top of the garment and heat pressed with medium pressure for about 15 to 20 seconds. This entire process is known as curing.
As it cools, the melted powder will act as a strong binder that holds the colored inks together with the garment’s fibers. Once the film cools to room temperature, carefully peel it off the garment. The design has now been transferred onto the garment!
For even better results, experts recommend that you heat press the garment one more time for about 10 to 15 seconds. This will result in a much more resilient transfer, making it more durable in the wash or less prone to cracking when stretched.
Setting Up for DTF Printing
There are a few core components you need to start printing designs.
The DTF Printer
The most obvious one is the DTF printer itself. Without it, you won’t be able to print any of your designs. A simple option for starting with DTF is using a converted printer.
A converted printer, in this case, is a modified inkjet printer specifically retooled for DTF printing. These printers come with multiple CMYK ink tanks and a modified exit tray to prevent jams and ensure that prints come out smoothly, among other changes.
The Epson L1800 desktop inkjet printer is relatively easy to obtain at a low cost, making it a good choice for entry-level converted printers. Spare parts are also relatively easy to find on the market. However, its printing speed isn’t the fastest on the market. You could find other reliable options, such as converted Epson P600s, P800s, or R3000s. You can still find converted printer starter kits for sale online, but these aren’t as affordable as they used to be.
Large-scale commercial DTF printers also exist, which have a faster printing speed compared to a converted printer. Some of these printers also incorporate parts of the printing process into their hardware; for example, a DTF printer like the DigitalHeat FX DTF 24H2 might have a powder shaker that automatically coats the film with hot melt powder.
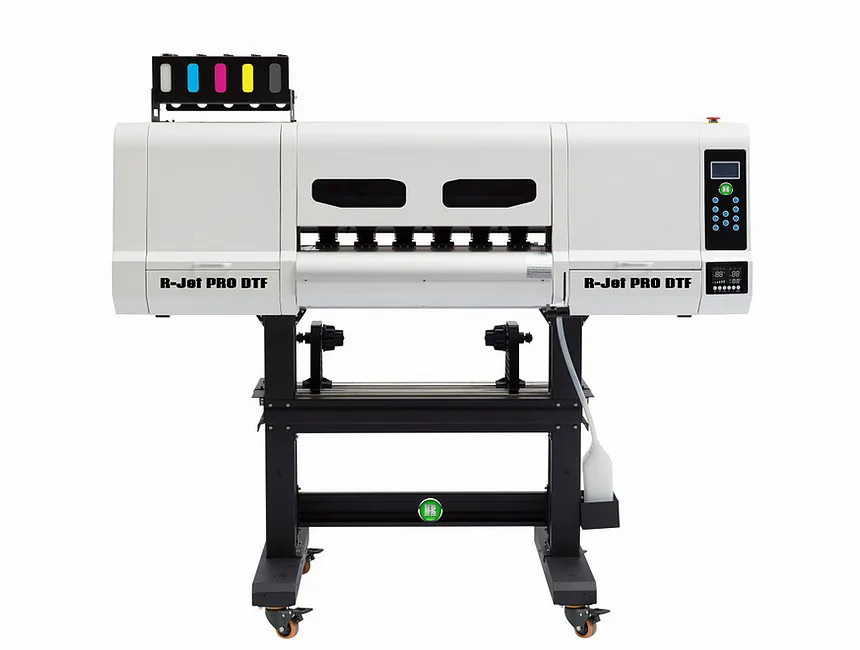
Other industrial printers out there include:
- DTFPRO Panthera V2
- Printomize Peregrine x4
- TheMagicTouch UK R-Jet Pro DTF600
- Sublicool XYS-01 24” DTF Printer
PET Films
PET, or polyethylene terephthalate, films differ from the ones you might use for screen printing. They are usually listed as DTF transfer films to differentiate them on the market. These films have a thickness of about 0.75mm, offering better transferring properties than screen printing films.
PET films are sold in either cut sheets for use by smaller print shops or as larger rolls used by larger commercial printing companies. Sheets are usually ideal for small-scale printing jobs, while rolls are used in larger commercial machines.
PET films are also characterized as either hot peel or cold peel films. Hot peel films allow you to remove the film after applying the design without waiting for the film to cool. Cold peel films are the opposite: heat must be removed first, and the film allowed to cool before you can peel off the film.
Software
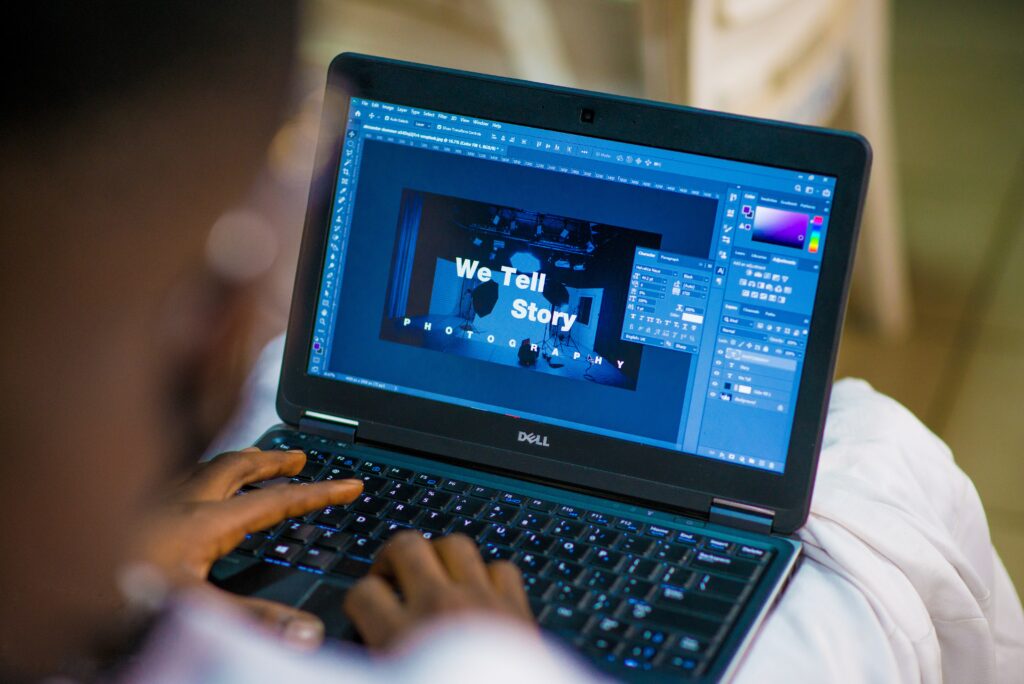
DTF printing can easily take on complex designs with intricate details. Still, you’ll need the right software to get the correct print characteristics, color performance, and overall print quality post-transfer. The RIP software you plan to use must be able to handle CMYK and white colors. AcroRip is one well-known RIP software used by many garment printers.
You can purchase a copy of AcroRip, which is compatible with a wide range of printers, for at least $300 or more from authorized resellers. Some resellers also offer onboarding support packages, allowing you to get help setting up the software to work with your printers.
It helps to familiarize yourself with color management and ICC profiles to ensure you’re maximizing the capabilities of your software and avoiding potential mistakes when applying the colors to the prints. Poor color management might mean you’ll be getting the wrong shade of red for a design. As such, properly managing these aspects is important to achieve excellent print quality.
Hot Melt Adhesive Powder
This white granular powder-like substance is the adhesive that binds the ink of the print to the fibers in the fabric. Most high-quality powders are made from Thermoplastic Polyurethane or TPU, although some powders are made using a combination of TPU and other components or entirely from other parts.
You’ll usually find powders in one of two colors: black or white. The white powder is the most common powder type, used for any material or color, while black powder is generally used for black garments.
Different grades of DTF hot melt powder exist and are specified in microns. Fine-grain powders, for example, range between 0-70 microns and have a flour-like texture. Other texture types include a “medium” powder with a table salt texture and a “coarse” powder that feels like sugar crystals.
The type of powder to use will vary based on printing requirements, such as fabric compatibility, feel, flexibility, and durability of the prints. The larger the particle size, the more secure it is when it adheres the ink to the garment. However, this does make the print feel less soft.
Printing Inks

Digital water-based inks are used for DTF printing. They’re pretty similar to DTG inks but with some pigment modifications. DTF mainly uses white inks and the CMYK color gamut – CMYK stands for Cyan, Magenta, Yellow, and Black, by the way (the ‘K’ represents black, or ‘Key’; it honestly sounds better than CMYB).
CMYK delivers the best results on printed materials, as it is how we replicate colors with inks. You can combine these four colors to make any color while also maintaining prints with many different colors, gradients, and shading. Meanwhile, white ink serves as the foundation, or “undercoat,” for the CMYK color inks, which helps bring your design to life.
Heat Press

The heat press is mainly used to pre-press garments before transferring a design and later to press garments to allow the print to be transferred onto the garment. If you don’t own a curing oven to melt the adhesive powder, you can also use a heat press to do that. Just be sure to use it in “no contact” mode if the mode is available; note that this may vary with different brands of inks and transfer films.
The heat press is an essential component of your DTF printing because it’s what you need to use to adhere the design to the surface of your chosen substrate. You need to consistently apply the right amount of heat and pressure in order to get a top-notch print; if either of these isn’t optimal, your design could either peel off, flake, or even refuse to adhere to the substrate.
Cover Sheet
A cover sheet is used to protect the transfer film when it’s being heat pressed. In some cases where a heat press doesn’t have a “no contact” mode, or if the film needs to be pressed down onto the substrate, the cover sheet will ensure that the transfer film doesn’t get damaged or singed in the process.
Automation Systems
By automation systems, we mean equipment that can help reduce the time to finish a batch of prints. Equipment considerations include curing ovens, automatic powder shakers, or roll-to-roll cutting machines. That can mean less time spent on manual tasks like applying the powder or cutting designs.
Automation systems aren’t necessary to purchase. You can closely match these systems’ output levels if you have a great setup and well-planned workflow. Expect to dish out a hefty sum for these systems, though. One automatic powder shaker and dryer, the STS 24”, comes with a price tag of $9,880.
Setup Costs for DTF Printing
In contrast to DTG printing, DTF printing doesn’t have a very high entry ceiling in terms of investment costs. Entry-level printers are inexpensive and can help you get started once you’re set up.
Equipment
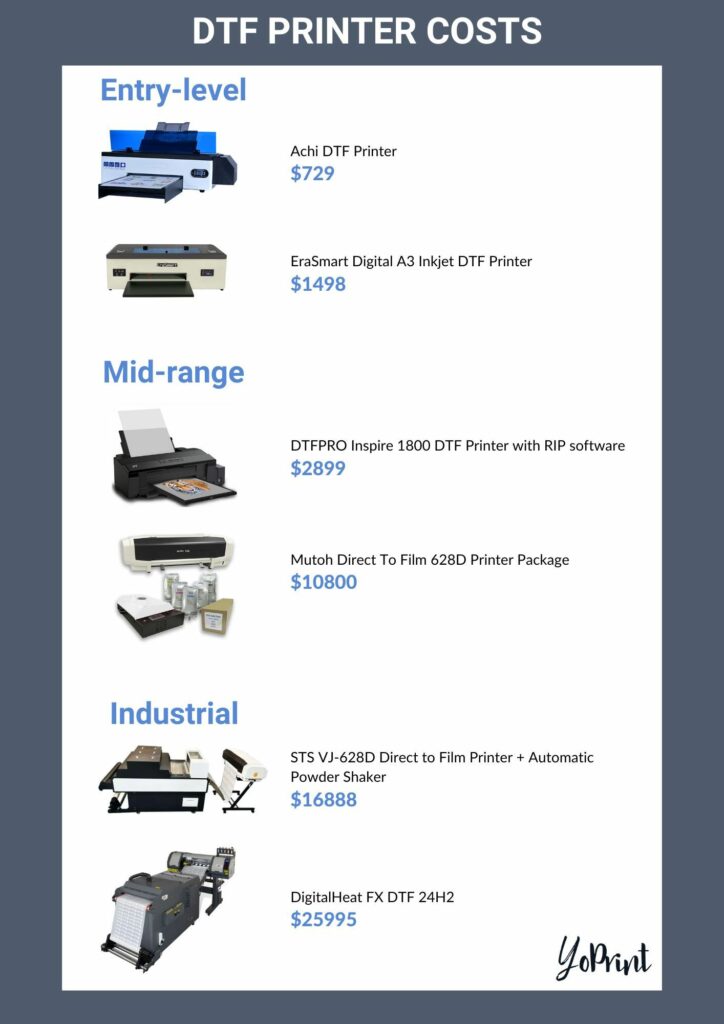
Entry-level printers like a converted Epson L1800 can go for as low as $600 to $2,000 on various online resellers; as mentioned earlier, however, these are increasingly hard to find. Other converted alternatives usually go for at least $1,000. Most sellers do offer several add-ons to sweeten the deal, such as starter kits that include inks and films, among other things.
Higher-grade printers can cost a little higher, but you won’t be breaking the bank when purchasing one compared to the price of a mid-range DTG printer. For example, the DigitalHeat FX DTF 24H2 printer can be yours for the cost of $25,995 only. It also includes an automatic powder shaker and a dryer to automate the powdering and curing process.
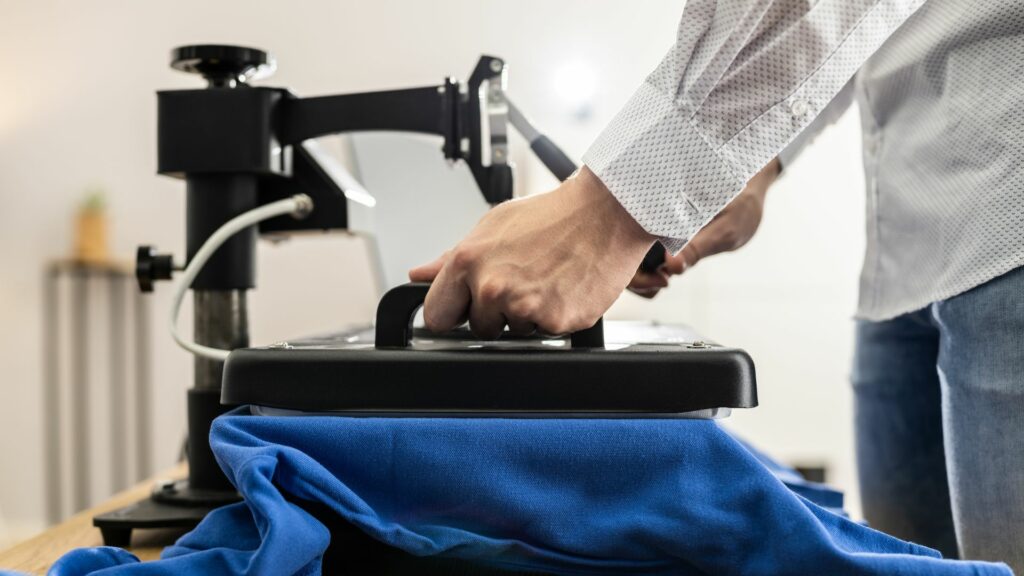
A decent heat press can cost you about $200 and above. If you’re on a budget, Cricut sells small-scale heat presses that go from $50 to $250, but these are relatively small in size and not ideal for bulk orders. Larger, reliable flatbed heat presses like those made by Fancierstudio, Vevor, and Hotronix would better suit your business needs.
Consumables
You may be able to purchase 500ml bottles of CMYK ink for $12 per unit. Some sellers even offer preferential rates for larger orders. Larger quantities above 500ml can go for about $50 or more.
For DTF transfer films, you can usually find them in either A4 or A3 sizes. You can buy cut sheets in 50 to 100 sheets per pack. As for film rolls, you can get a 30cm wide and 100m long roll for $100 and above.
Labor Considerations
Even if you are operating a one-man show or have help from family members, you still need to determine your labor cost and decide on your overall profit margin from sales.
- Sales Time – looking for customers is also a labor cost. It can depend on whether they’re walk-in customers recommended by previous clients or cold-call customers.
- Accounting Time – how much time you spend settling your business accounts, be it preparing quotes or sales orders, contacting vendors, or even negotiating with customers.
- Shipping & Handling – how will you deliver your orders to your customers? What considerations should you weigh when planning to ship orders out?
- Maintenance – how often should you clean the printers? Will you need to run daily cleaning cycles or only if they’ve not been used in a while?
Entry-level setups allow a single person to create custom garments, but once demand increases, you’ll need to think about getting newer and better equipment as well as hiring people to help you out. Be realistic about your assessments of labor costs, especially if you have a team of employees helping you run the business and get garments printed. You’ll need to factor in their salary and overhead costs, such as utilities, when everyone is working hard in the shop.
Getting Your Return On Investment (ROI)
If you can put out a good amount of prints to your clients, you’ll be able to recoup your ROI reasonably quickly. Because most DTF consumables are inexpensive, you can easily tailor your business to maximize profits without sacrificing quality or production times.
Using entry-level printers can be a challenge to see a total ROI in a short time, given the slower printing speeds compared to most mid-range printers. Using multiple printers can help mitigate the issues with production time, but be sure you plan ahead so you don’t make unnecessary investments.
For example, a converted Epson L1800 has an estimated printing time of 10-15 minutes for a standard A4-sized transfer film. In contrast, an industrial printer can produce more prints in a shorter time while maximizing profits. In the case of the DigitalHeat FX DTF 24H2 printer, you can easily make a profit of approximately $850 from a single order of 60 shirts with prints on both sides.
Most entry-level printers may have a printing speed of between 5 to 10 A3-sized sheets per hour (subject to other criteria such as design complexity). Industrial printers have their output measured in square meters (m2) since they use transfer film rolls instead of single sheets. The Printomize Peregrine x4, for example, boasts a printing speed of 10-18 m2. The TheMagicTouch UK R-Jet Pro DTF600, on the other hand, has a printing speed of 15 m2 (according to the manufacturer’s estimates).
You can always inquire about the printing speed of a printer you’re planning to purchase or ask for a demonstration of its printing capabilities to see how it performs. The faster your printer’s speed, the more prints you’ll be able to output in a short time.
Calculation Samples
For an entry-level setup, your total investment for all the necessary equipment might look like this:
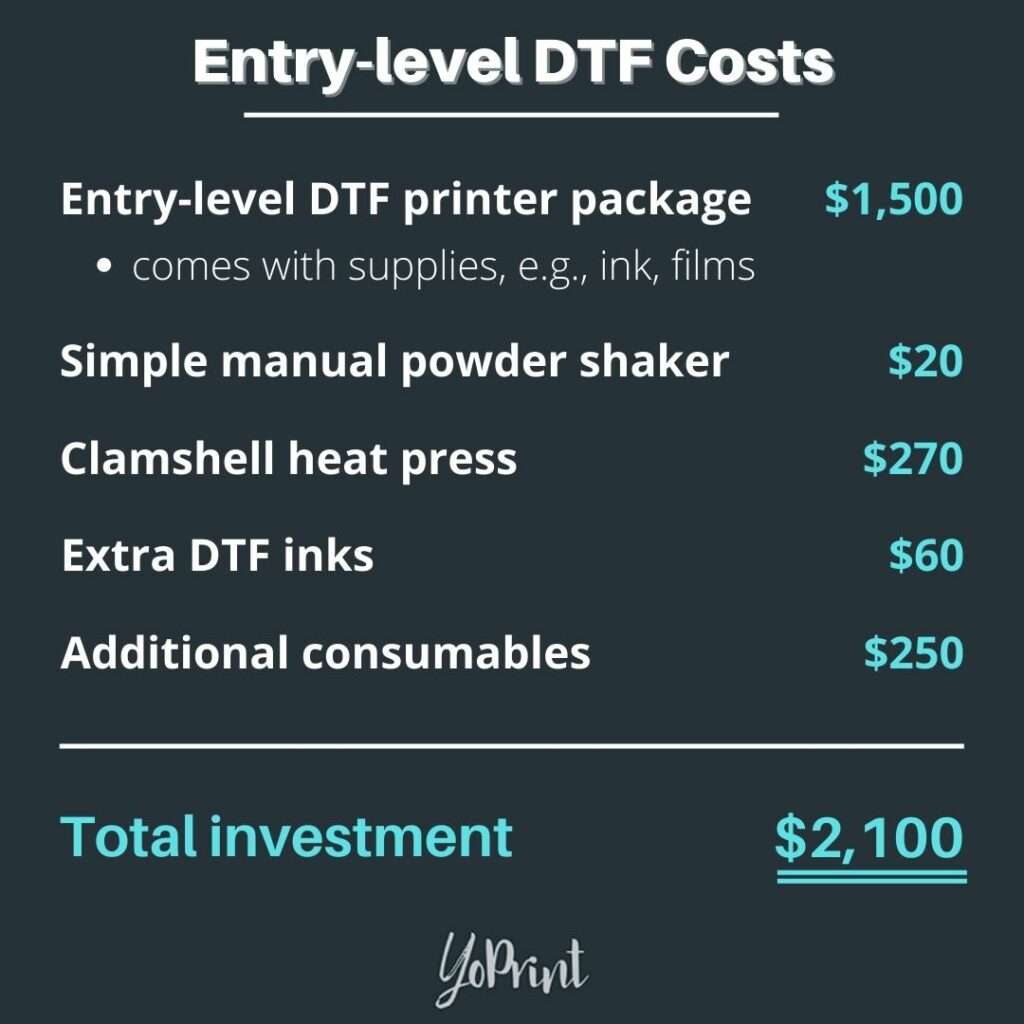
Pricing your services can be difficult to do as you need to balance between pricing for profit and winning over interested customers. If your prices are too low, you might not be able to break even; if it’s too high, customers might overlook you as you’re higher than current market trends.
Here’s a rough estimate to know how many shirts you’ll need to sell to achieve your ROI:
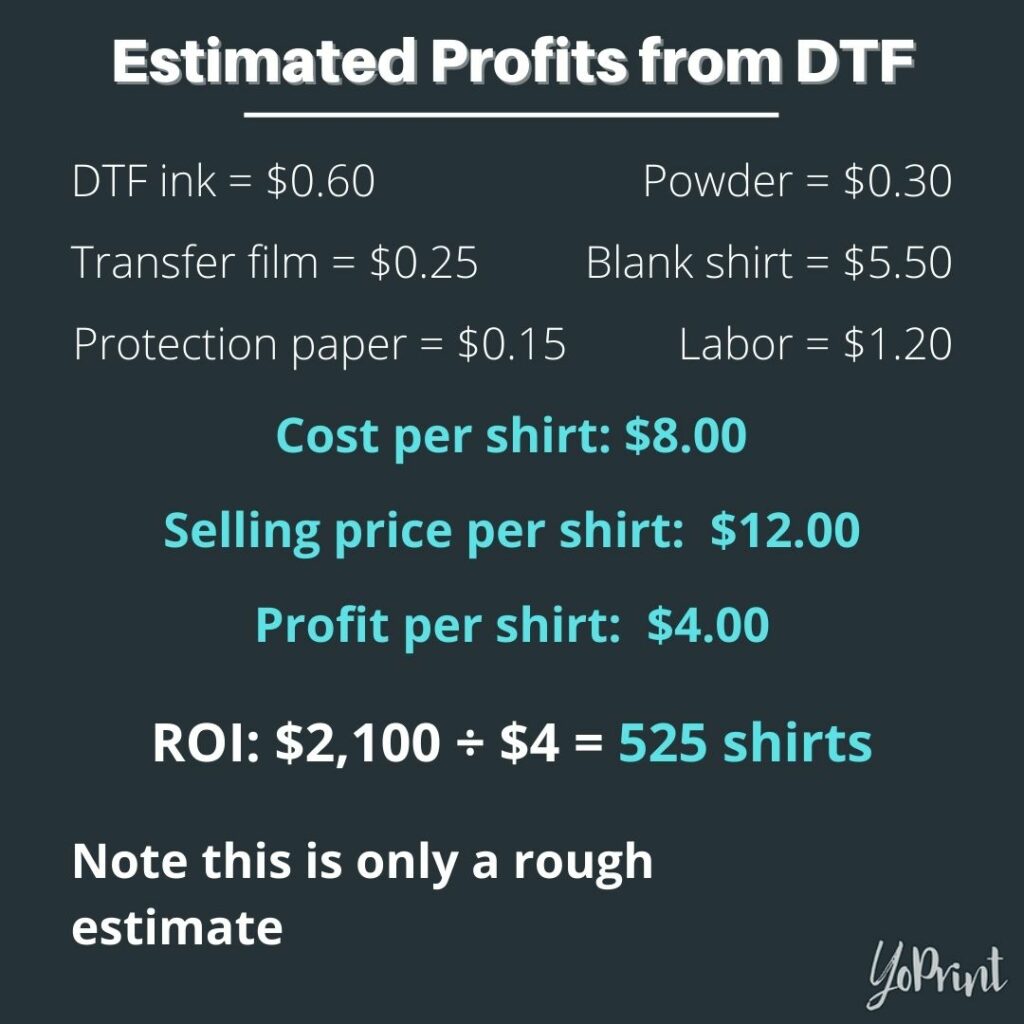
Assuming you’re able to print 50 shirts in a day, you can easily achieve your ROI in the span of 10 to 11 days!
Do remember that these are only estimates. You can still tinker with your pricing structure depending on the kind of materials you use for each order and your planned price markup. You might find good quality transfer films sold at a low price, which helps keep your costs down.
The Pros and Cons of DTF Printing
DTF printing offers several advantages thanks to its unique printing capabilities. For most people in the industry, what they see DTF being able to bring to the table is enough to convince them that this is where printing’s future is headed.
On the other hand, there are still shortcomings to what DTF printing can offer potential users, given that it’s a recent innovation. Given time, DTF printing can provide a robust printing solution once it overcomes the growing pains of the technology. We’re keen to see where that road leads.
Until then, you can still consider what DTF printing offers today.
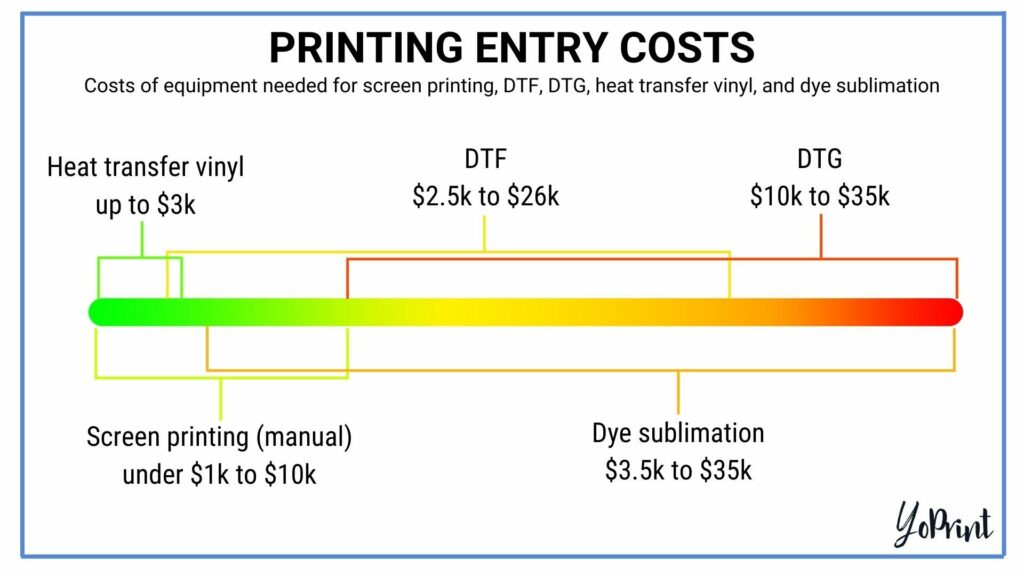
Entry Costs

As mentioned, getting started isn’t very cost-prohibitive as you can find printers at low prices. Sure, most entry-level printers might have prevailing issues, mainly concerning speed and print quality. However, you can resolve these issues with proper setup and sound quality RIP software and inks, among other things.
Assuming ideal circumstances, you might be able to get an entry-level setup. It includes an entry-level DTF printer; a starter set of DTF inks, transfer films, and hot melt powder; the AcroRip software; a cutting board; and a good quality heat press – for approximately $1,500 to $3,000. It’s not as cheap as when converted printers were all the rage, but they’re still more affordable than other decorative methods.
For an industrial-level setup, on the other hand, you can buy a complete printing machine with other automated systems (like the DigitalHeat FX DTF 24H2 printer), such as an automatic powder shaker and heater as well as a heat press, for upwards of $15,000 or higher.
In the case of DTG, an entry-level converted printer is usually recommended for those starting up a business. Mid-range printers like the Brother GTX Pro can go for about $25,000 or higher, putting you over budget. On the other hand, a DTG starter kit (with Dupont inks and pre-treatment solutions), a pre-treatment machine, a heat press, and AcroRip software may cost around $3,200 or more just for a simple starting setup.
Dye sublimation entry costs are comparable to DTG. You can acquire most entry-level printers for less than $1,000. Add it to the cost of equipment and consumables – the sublimation transfer paper, dye-sub inks, RIP software, a cutting device, and a reliable heat press, and you may go around $3,500 or so in total.
Screen printing still has one of the lowest entry costs compared to the other printing methods. A simple setup will have a 4-color, single station, rotary screen printer; plastisol (or compatible) inks; emulsion for the screens; some mesh screens; wooden squeegees; and a heat press. All in all, you will only need to spend about $1,000 or so for all this.
Another contender for low entry costs is heat transfer vinyl. All you need are a cutting machine, weeding tools, heat transfer vinyls, a heat press (a cheap recommendation is to use a clothes iron), and pressing tools. With careful research and budgeting, you can get all that within $800.
Consumables
In line with the above, consumables are affordable compared to DTG printing supplies. For the price of a DTG ink bottle, you could be able to buy 2 DTF ink bottles of a similar capacity – but you’re getting them that much cheaper!
You also save on the amount of white ink you use. DTG printing has a higher white ink use rate than DTF, so every dime you can keep in the long run can go a long way in total savings.
Acquiring affordable but good-quality transfer films and adhesive powder is also possible – and is much cheaper than buying pre-treatment liquids and equipment.
Output
DTF printing requires a reliable printer, the necessary DTF consumables, a way to cut out the printed films, and a heat press to get you to print garments. You can easily invest in automation systems, like a powder shaker, down the road, but those augment your outputs and improve your profit margin over time.
Costs aren’t just restricted to finances, after all. Time is an all-important cost factor as well. Using DTF, you won’t need to worry about other processes like pre-treatment, drying pre-treated garments, setting up and exposing screens, or reclaiming/cleaning screens, slowing down your production process.
While they share some similarities with vinyl transfers, you won’t need to weed out any excess vinyl from your DTF design: just print your design and heat-press it onto the garment. Easy peasy!
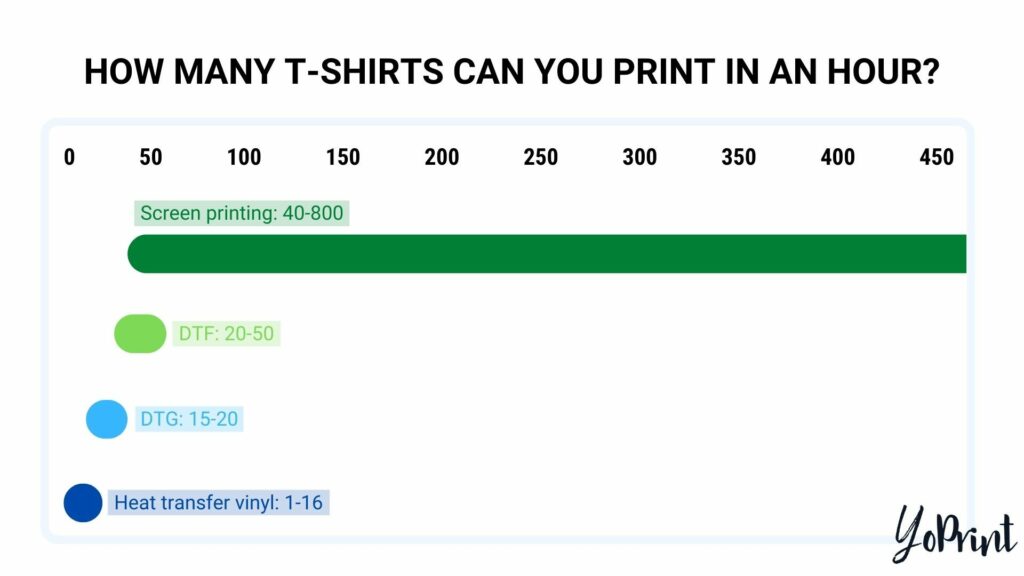
With the proper setup for your shop, you’ll be able to put out a decent amount of printed transfers (between 10-20 per hour for entry-level printers; more than 30 per hour for industrial printers), which can be heat-pressed onto the garments you’re selling. Not having to pre-treat and dry garments is another plus point that gives you more time to focus on printing and preparing garments for shipment.
However, screen printing still dominates when it comes to bulk orders. An optimal screen printing setup can effortlessly print out a large number of shirts. While DTF printing can comfortably handle large orders, it still has ways to catch up to screen printing’s sheer production capabilities at full steam.
Versatility
This is possibly DTF’s most significant strength that puts it on par with screen printing. Working with various substrates grants you unprecedented opportunities to expand your clientele. Polyesters? No problem. Rayon? Right on. Silks? Sure thing. The possibilities are limitless!
Contrast this with DTG printing, whose inks only work on garments with at least 50% cotton; on other substrates, you risk inks not being absorbed by the substrate or prints cracking after a wash cycle. Dye sublimation, another contender, is mainly limited to plastic substrates, like polyester. You could use dye sublimation on natural fiber (i.e., cotton) garments, but you’ll have to pre-treat the garment with a polymer coating beforehand.
DTF’s versatility doesn’t end there, though. You won’t even have to restrict yourself to just printing on garments. Why not expand to putting your transfers onto water bottles, Thermos mugs, signboards, and more? It’s easy to transfer your designs onto virtually any surface, regardless of whether their shape is flat or contoured (like water bottles).
To take things even further, why not stash away a few hundred film sheets of that design for later use? You can do that. Simply keep them in a folder or some other secure storage media, and sort them nicely in a drawer or cabinet for future use.
Keeping them carefully stored will prevent dust or other particulates from collecting on your prints. This way, you can reuse these prints or even sell them to interested customers in the future without a hitch.
Color Vibrancy

Screen printing still shines with its vibrant Pantone-matching color range, easily able to meet the needs of corporate clients who need their corporate logo printed with the correct color gamut.
Now CMYK is good, don’t get us wrong, considering it does convey colors as accurately as can be printed onto a physical medium. However, it does lack the vibrancy that most customers would prefer. This is a matter of preference, though; newer DTF printers can capture a good color vibrancy that’s appealing to the eyes.
Because no two monitors, printers, and color inks are the same, you’ll need to be able to manage color expectations – especially if you’re using the RGB gamut for making the designs and then printing them out with CMYK inks. RGB does not translate its colors very well into CMYK, after all.
The best way to mitigate this is to use a Pantone Bridge tool, allowing you to preview what RGB colors will look like once it’s printed into CMYK. This way, you can best manage a customer’s color needs based on the closest matching color. You may need to discuss this in detail with your customers so that they’re satisfied with the results.
Print Quality
You might not get the same soft hand of DTG prints, but once transferred, a DTF print can still give you a decently soft touch. If anything, your customers will get a much smoother print than vinyl prints. Now try stretching and contorting the design as much as you can. You’ll find that your design can retain its original shape. In fact, take a closer look at the design, and you’ll find no cracking or peeling at all!
It’s recommended that your transfers be heat-pressed a second time with a finishing sheet. Doing so will allow the adhesive and inks to set even deeper into the garment, giving it a more durable finish.
Though soft, it’s nowhere as soft as a DTG print and is usually compared to a screen-printed design. Screen-printed designs are known to have a somewhat plastic-like feel to them. You might not be turning a lot of heads with the print quality, as some customers might prefer that soft hand to printed designs.
DTF printing does excel on polyester (and other similar) substrates, since you won’t be able to distinguish between the print and the material itself. Even so, improvements to DTF technologies have enabled newer ones to print with a very comparable soft hand to DTG’s.
Maintenance

DTG and DTF printers share similar maintenance cycles, especially if you use a converted printer for your DTF prints. While DTF printers don’t need as much maintenance as DTG printers, regular maintenance is still required to ensure they run smoothly even when you’re not running them.
Basic maintenance may require that you run a standard print head cleaning cycle, or you may need to gently shake the ink tanks to prevent the inks from settling and potentially causing a print-head clog. Different printers require different maintenance methods, so be sure to read the included manual thoroughly before starting any printing jobs.
There’s quite a fair bit to do where maintenance is concerned, which can also be based on your type of printer. If you’re unsure how to do it, you might end up with more problems than you began with. Converted printers aren’t plug-and-play machines, after all, and that’s a mistake most newcomers fail to understand before they get into DTF printing.
In fact, the biggest caveat to buying a converted printer is the lack of support. There’s no support channel that can help you if you’re having difficulties with your printer. You could always look up various tutorials on YouTube for help, but again, self-maintenance is at your own risk.
DTF printers sold by vendors will usually have some measure of support to help you out. First-time buyers also get a complementary installation and walk-through with their new printer, allowing them to get started almost immediately after learning the essentials. You can also reach out to their customer care center and either get step-by-step troubleshooting assistance, or be able to call a technician to see what’s wrong with your printer.
Other Heat Transfer Methods
DTF printing might be a popular heat transfer decorative method, but it isn’t the first of its kind. There are other decorative methods that make use of heat transfer principles like DTF.
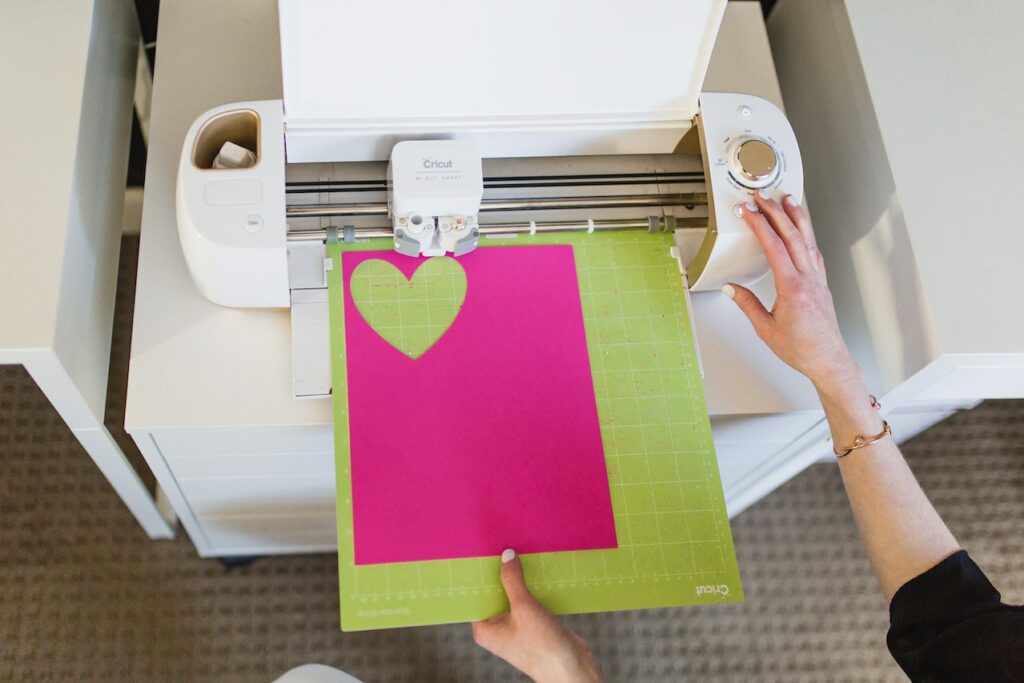
Heat transfer vinyl (HTV) is a predecessor to DTF printing. It also adheres a design to the surface of a substrate, but you’ll instead cut out a design from colorful vinyl sheets rather than print the design with inks. It’s also a durable print method and offers a wide variety of specialty vinyl like foil, glitter, and more.
White toner laser printers also make use of heat transfer printing. It shares plenty of similarities with DTF, like printing designs on transfer films and transferring them to a substrate via heat press. White toner printing’s main draw is that it uses toners (powder ink mixtures) and no liquid inks, and therefore, doesn’t need as much maintenance as DTF printers might. They can be a little pricey ($5,000 for a starter kit from Uninet), but still deliver quality prints.
DTF may be affordable to start with, but it can’t hold a candle to HTV. With an affordable desktop vinyl cutter, a weeding tool, a heat press, and some vinyl sheets, you might only need to pay less than $500 for everything you need to start with HTV!
DTG transfers are also a potential contender to DTF printing, adopting the same principles as DTF except using DTG equipment and inks. Though not as widespread as DTF printing, it still offers DTG printers the ability to print on other substrates that DTG printing normally has difficulty with. While this allows DTG users to transition to the simpler methods of DTF, newcomers would still be better off starting with DTF printing anyway owing to its more budget-friendly startup cost.
Screen printed transfers are also possible through standard screen printing kits. Again, it’s the same principles as DTF except that you drive ink through a mesh screen to create the design on a transfer paper, then heat press it to the substrate. By now, you’ll n
Important Things to Consider
DTF printing’s advantages continue to shine as more newcomers are looking to print their own custom garments. We believe it will be the future of garment printing with how it leverages new applications and technologies to conduct garment printing as a whole.
Going into DTF printing means having to be hands-on from start to finish, much like screen printing. It may be a little less laborious than screen printing, but you’ll still need to work to get your desired products out. As you grow, though, and you’re able to acquire new equipment to automate your production line and smooth out the workflow, you’ll be recouping your ROI in no time.
Having said that, though, should you get into DTF printing now? We’d agree that it’s a good idea to take that plunge. In our eyes, the most crucial factor that makes DTF a winner is its fantastic versatility. Now, you’re no longer limited to making shirts; you can have film transfers for book covers, water bottles, signboards, metal sheets, and so much more. The best part is saving up extra prints to be sold to people who’d like to transfer them onto items or garments they own. They won’t need any specialized equipment to do it themselves.
The DTF market is still expanding, and that means there’s still a lot of room for experimentation and growth. We can already see that more people are taking up DTF printing to kickstart their custom apparel printing business, and with good reason. As technology continues improving, we reckon DTF printing will shake the industry further.
